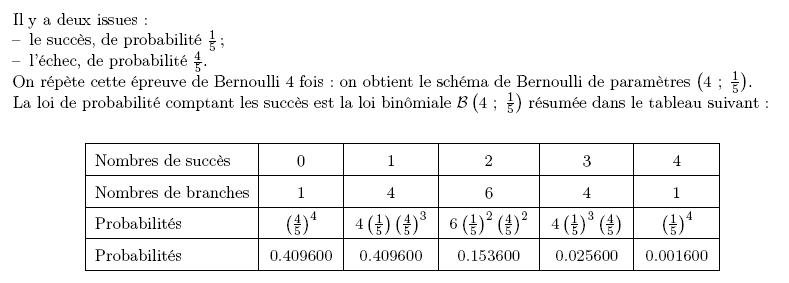
Cet outil a pour but de faciliter la rédaction de documents sur les probabilités.
Dans le préambule
On rajoute ceci :
\usepackage[xcas]{pro-probas}
pro-arbre22
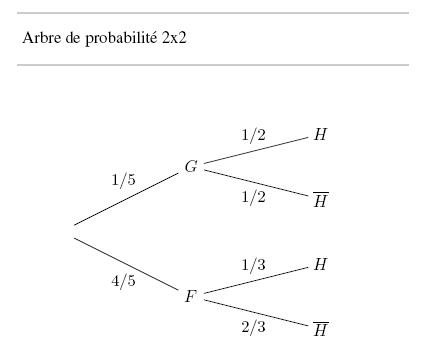
Cet environnement sert à construire un arbre 2×2.
\begin{pro-arbre22}{1}
["G",1/5,"F"], // premier niveau
["H",1/2,1/3], // deuxieme niveau
// ----------------- debut des options
[
["rien"]
]
// ----------------- fin des options
\end{pro-arbre22}
On obtient :
NB : le code source correspondant est enregistré dans le fichier :
nomfichier_arbre22- i.mp, la valeur i étant donnée en argument.
pro-ana22
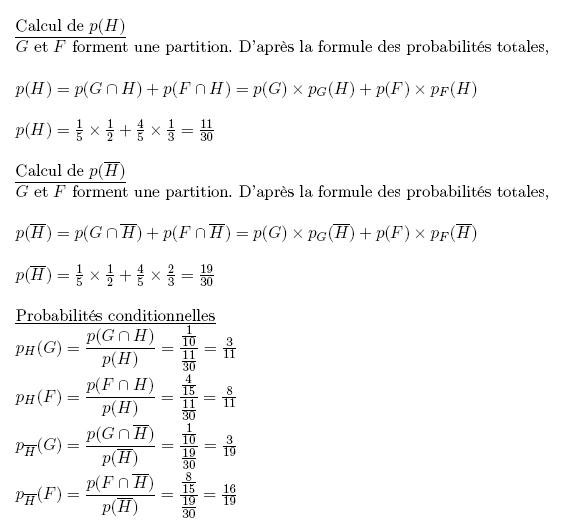
Cet environnement sert à analyser un arbre 2×2.
\begin{pro-ana22}{1}
["G",1/5,"F"], //premier niveau
["H",1/2,1/3] //deuxieme niveau
\end{pro-ana22}
On obtient :
NB : le code source correspondant est enregistré dans le fichier :
nomfichier_ana22-i.tex, la valeur i étant donnée en argument.
pro-arbre32
Cet environnement sert à construire un arbre 3×2.
\begin{pro-arbre32}{1}
["A",1/5,"B",1/3,"C"], // premier niveau
["H",1/2,1/4,1/5], // deuxieme niveau
// ----------------- debut des options
[
["rien"]
]
// ----------------- fin des options
\end{pro-arbre32}
On obtient :

NB : le code source correspondant est enregistré dans le fichier :
nomfichier_arbre32- i.mp, la valeur i étant donnée en argument.
pro-ana32
Cet environnement sert à analyser un arbre 3×2.
\begin{pro-ana32}{1}
["A",1/5,"B",1/3,"C"], // premier niveau
["H",1/2,1/4,1/5]  // deuxieme niveau
\end{pro-ana32}
On obtient :

NB : le code source correspondant est enregistré dans le fichier :
nomfichier_ana32-i.tex , la valeur i étant donnée en argument.
pro-arbre23
Cet environnement sert à construire un arbre 2×3.
\begin{pro-arbre23}{1}
["G",1/5,"F"], // premier niveau
["A",1/5,1/2,"B",1/3,1/3,"C"], // deuxieme niveau
// ----------------- debut des options
[
["rien"]
]
// ----------------- fin des options
\end{pro-arbre23}
On obtient :

NB : le code source correspondant est enregistré dans le fichier :
nomfichier_arbre23- i.mp , la valeur i étant donnée en argument.
pro-ana23
Cet environnement sert à analyser un arbre 2×3.
\begin{pro-ana23}{1}
["G",1/5,"F"], // premier niveau
["A",1/5,1/2,"B",1/3,1/3,"C"]  //deuxieme niveau
\end{pro-ana23}
On obtient :

NB : le code source correspondant est enregistré dans le fichier :
nomfichier_ana23-i.tex, la valeur i étant donnée en argument.
pro-bernoulli
Cet environnement sert à construire un schéma de Bernoulli.
Dans ce premier exemple, il y a deux répétitions :
\begin{pro-bernoulli}{1}
["S",1/5,"E"],
2,
// ----------------- debut des options
[
["rien"]
]
// ----------------- fin des options
\end{pro-bernoulli}
On obtient :

NB : le code source correspondant est enregistré dans le fichier :
nomfichier_pro-bernoulli i.mp, la valeur i étant donnée en argument.
pro-anabernoulli
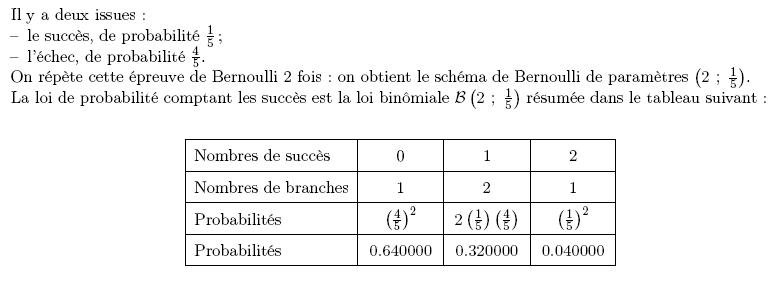
Cet environnement sert à analyser le schéma de Bernoulli associé.
\begin{pro-anabernoulli}{1}
["S",1/5,"E"],
2
\end{pro-anabernoulli}
On obtient :
NB : le code source correspondant est enregistré dans le fichier :
nomfichier_anabernoulli i.tex, la valeur i étant donnée en argument.
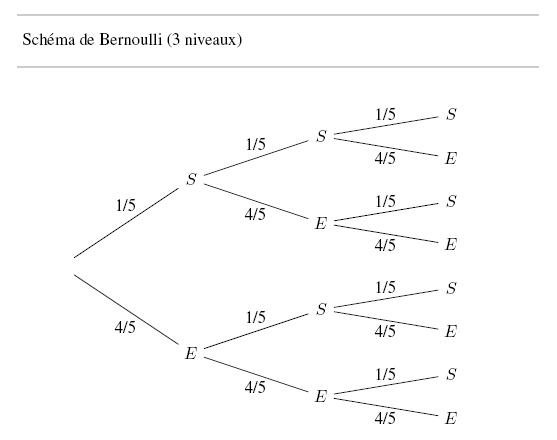
Exemple avec 3 répétitions
\begin{pro-bernoulli}{2}
 ["S",1/5,"E"],
 3,
 [                 // ----------------- debut des options
 ["titre-gauche","Schema de Bernoulli (3 niveaux)"]
 ]                // ----------------- fin des options
\end{pro-bernoulli}
On obtient :
\begin{pro-anabernoulli}{2}
 ["S",1/5,"E"],
 3
\end{pro-anabernoulli}
On obtient :

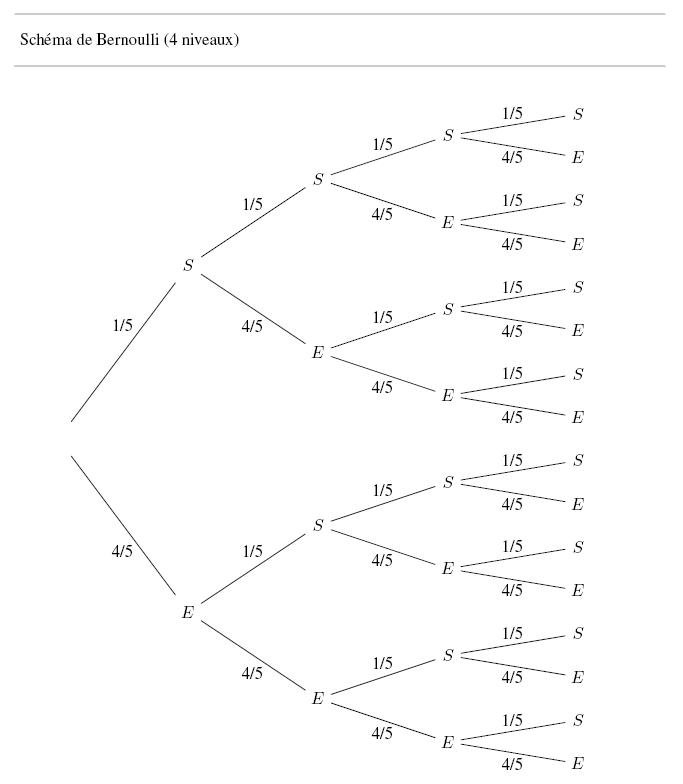
Exemple avec 4 répétitions
\begin{pro-bernoulli}{3}
 ["S",1/5,"E"],
 4,
 [                 // ----------------- debut des options
 ["titre-gauche","Schema de Bernoulli (4 niveaux)"]
 ]                // ----------------- fin des options
\end{pro-bernoulli}
On obtient :
\begin{pro-anabernoulli}{3}
 ["S",1/5,"E"],
 4
\end{pro-anabernoulli}
On obtient :
